


 Contact Us
 M-F 9am - 6pm ET
 Request parts
 Request Service

Should I carry my mobility device inside or outside of my vehicle?
This depends on your vehicle type, your mobility device type and your personal preference. Read more about the types of lifts here.
I want an inside lift. Should I pick a boom or platform version?
Boom interior lifts resemble a small crane that lifts the scooter or power wheelchair via a reinforced strap, and mount in the rear cargo areas of station wagons, minivans, and SUVs, as well as in a side-entry location on minivans. Further, boom lifts can be used in trunks on sedans via a quick-release base where a compact power wheelchair or scooter lifts into the trunk, then the boom is removed and stowed, allowing the trunk lid to close.
Interior platform lifts allow you to place and secure the scooter or power wheelchair onto a platform that, at the touch of a button, lifts upward, then slides inward on tracks, stowing the power wheelchair or scooter inside the vehicle. Beyond keeping the mobility product secure within the vehicle interior platform lifts also have no equipment outside the vehicle, retaining the vehicle's standard length and appearance. Most interior platform lifts mount using existing securement points within the vehicle so no holes in the vehicle are required.
How do I know what type of hitch I have on my vehicle?
See the Hitch Information section.
Is my vehicle compatible with the lift I want?
Please call our experts at 1-800-850-0335 with your exact vehicle information. We'll research the options and present you with a list of possible vehicle lifts that can work to meet your needs. Read more about compatibility and check your vehicle/lift compatibility in the Compatibility section.
Can I install the lift myself or do I need professional installation?
Installation of a vehicle lift is, as a rule, not complex. The installation varies depending on your type of lift. Read step-by-step installation instructions in the Installation section.
There are many different vehicle lifts to choose from depending on your vehicle, your mobility device and your personal preference. Named for where the mobility device is stored (not for the location of the lift on the vehicle), all vehicle lifts are categorized as either an Outside or Inside variety. See more information about the types below.
Outside Lifts
Outside platform lifts all mount on a hitch on the outside of the vehicle. Depending on the model, lifts attach to a Class I, Class II or Class III hitch receiver. Exterior lifts are a great choice because they don't consume any space within the vehicle, preserving maximum cargo room and passenger seating.
Manual Platform Lifts
- Provide the most economical solution.
- Are available in steel or aluminum.
- Most fold up against the car when not in use.
- Use "tie-down" straps to secure the scooter or power chair.
- Require some manual effort to release ramp, so they may not be the best choice for those with limited strength or dexterity.
- Manual platform lifts do not swing out of the way for trunk access.
- Require a Class II or III hitch. See the Hitch Guide.
Power Platform Lifts
- Power platform lifts require no physical labor to operate and automatically secure the device with a hold-down bar or retractable straps.
- These lifts are automatically folded against the vehicle when not in use and most offer a "swing-away" option for trunk access.
- Can be wired to the car battery or choose the free battery pack.
- Most require a Class II or Class III hitch. Click here for more Hitch Information.
Inside Lifts
Interior vehicle lifts allow a power wheelchair or scooter to be transported inside a car, truck, minivan, or SUV. The foremost benefit of an interior lift is that it protects your mobility product from weather and potential road hazards, a definite plus for those living in severe weather climates. Further, interior lifts can be mounted in the rear cargo section of vehicles, or in the side door of a minivan for easy user transfers and operation.
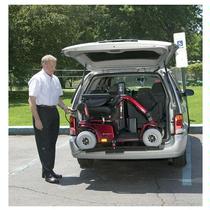
Inside Boom Lifts
- Act as a small crane to lift the device via a reinforced strap, and place it into the rear cargo area of vehicles, the side-entry location on mini-vans, or the bed of a pick-up truck.
- Can be used to load a compact power wheelchair or scooter into the trunk of some sedans.
- Use with vehicle trunks is limited by the size of the mobility product and the trunk size, and the seat typically needs to be removed during stowing.
- Require the use of the C-arm docking device to leave the seat on.
- Can be wired to the car battery or choose the free battery pack.
- Generally require at least 30 inches of headroom.
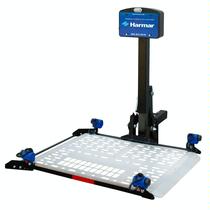
Inside Platform Lifts
- Offer a platform for the power chair or scooter that, at the touch of a button, lifts upward, slides inward on tracks and stows the power wheelchair or scooter inside the vehicle.
- Keep the mobility device secure within the vehicle and out of the weather and has no equipment outside the vehicle.
- Mount using existing securement points within the vehicle - rear seat mounts or seatbelt bolt mounts - so no holes in the vehicle are required.
- Are available for SUVs and vans, including mini-vans.
- Must either be wired to the car battery or use a battery pack.
- Generally require at least 30" of headroom.
Device Compatibility
On SpinLife, Vehicle Lifts are organized first by the mobility device that the lifts are designed to carry and then by the different lift types. You can view Scooter Lifts, Power Wheelchair Lifts and Manual Wheelchair Lifts.
These categories will help you to narrow your search but it is still essential that you confirm that the mobility device and vehicle you own are compatible with the particular lift you want. Please see Compatibility Tools section below.
Vehicle Compatibility
Although vehicle lifts are generally compatible with most mini-vans, standard vans, SUVs, trucks and some full-size cars, it is important to confirm that your vehicle is approved for the lift that you purchase. SpinLife will collect your vehicle information during the checkout process online or over the phone and ensure that your lift will work with your vehicle.
You may also use the compatibility tools below to help determine the compatibility of your vehicle with lifts by Pride Silver Star and Harmar.
Compatibility Tool
Both Pride Silver Star and Harmar offer online compatibility tools to determine which lifts will work with your mobility device and vehicle. Click on the logos below to use these tools (the sites will pop-up in a new window).

![]()
Having the correct combination of vehicle, hitch and lift is essential to transporting your device properly. Please read the information below to help ensure you select the lift that best suits your needs.
How to determine your hitch size:
 To determine the size of your trailer hitch, simply measure the width and height of its opening. The two most common sizes of trailer hitch openings are:
- 1-1/4" x 1-1/4"
- 2" x 2"
The hitch class should also be marked somewhere on your hitch.
Hitch type overview:
Hitch |
Inside |
Common |
Maximum Load |
Class I |
1 ¼ x 1 ¼ |
|
|
Class II |
1 ¼ x 1 ¼ |
|
Up to 300 lbs. |
Class III |
2" x 2" |
|
Up to 500 lbs. |
How to determine which hitch to use on your vehicle:
We suggest U-Haul's handy hitch selection tool to find the hitch options available for your vehicle.

How to determine which vehicle lifts work with each hitch size:
All outside lifts sold at SpinLife will work if you have a Class III or Class II hitch, although you may need a hitch adaptor (sold as an accessory on the product page).
SpinLife carries two outside vehicle lifts that will work if you have a Class I hitch:
Hitch Height:
Once your hitch is installed, you need to measure the height of your hitch from the ground. The specific distance required is listed on the product page of each hitch type. Most require the hitch to be 12" to 14" off the ground. If your hitch is higher or lower than the required distance, you can purchase an accessory known as a height adjustment bar. These bars allow you to effectively raise or lower the hitch receptacle to insure that the platform can function appropriately and does not "bottom out" when you are driving on an incline.
Even for the most handy individual, the prospect of installing a vehicle lift can be a bit intimidating. The good news is that the process is actually quite simple! See our step-by step instructions below.
Installing an Outside Platform Lift
Step 1:
All outside platform lifts require a hitch. Click here to view our hitch guide to find out what hitch you have, which hitch you need and other hitch information.
Step 2:
Once your hitch is installed, you need to measure the height of your hitch from the ground. The specific distance required is listed on the product page of each hitch type. Most require the hitch to be 12" to 14" off the ground. If your hitch is higher or lower than the required distance, you can purchase an accessory known as a height adjustment bar. These bars allow you to effectively raise or lower the hitch receptacle to insure that the platform can function appropriately and does not "bottom out" when you are driving on an incline.
Step 3:
Make sure you order the appropriate hitch adaptor so that the vehicle lift you select will work with the hitch installed on your vehicle. Some lifts work standard with Class II hitches and others work standard with Class III hitches. However, ALL outside hitches sold at SpinLife can work with either Class II or Class III hitches as long as you purchase the appropriate hitch adaptor.
Step 4:
To insure full access to your trunk or vehicle lift, order the swing-away option (available on most power platform lifts). This hitch adaptor allows the lift to swing out of the way when the scooter or power wheelchair is NOT on the lift.
Step 5:
Now, for powered outside lifts, determine whether you want to use a rechargeable battery-pack option or have the lift wired directly to your car battery. This is not difficult, and can be performed by any company that rents trailers or even by your auto dealership at minimal cost. Your lift will come complete with the appropriate wiring harness.
Step 6:
Time to install your lift! This is the really easy part: just slide your lift into the hitch, use the hitch pin to secure the lift, and attach it to the power source if necessary. You are on your way.
Installing an Inside Boom Lift
Step 1:
Get acquainted with the three elements of Boom lifts:
- The base unit which is bolted to the floor of your trunk or cargo area, usually in the corner on the passenger side. This is not difficult and can be performed by your auto dealer or a trusted mechanic.
- The vertical pole, which slides into the base unit. This pole can be cut to size for use in a van or SUV situation.
- The boom arm, which contains the motor. This mounts on top of the vertical pole.
Step 2:
All inside lifts require a power source. Determine whether you want to use a rechargeable battery-pack option or have the lift wired directly to your car battery. This is not difficult, and can be performed by any company that rents trailers or even by your auto dealership at minimal cost. Your lift will come complete with the appropriate wiring harness. No wiring is required with a battery pack, and you can even upgrade to a charger that plugs into a "cigarette lighter" adapter in your car and charges your lift while you drive. No need to ever remove the battery pack for recharging.
Step 3:
All Boom lifts can lift your scooter or power wheelchair with either the seat attached or not attached. Either way, you will receive a Docking Device that attached to the seat post of your vehicle. A standard docking device requires that you remove the seat before lifting the base with the boom arm. A "C-arm" docking device will allow you to leave the seat on the scooter or power wheelchair. Be sure to indicate which docking device you prefer during the checkout process.
Step 4:
Time to lift! Use the handy corded controller to push the button and lower the strap toward your power wheelchair or scooter. Attach the end of the strap to the docking device and hit the "up" button. For manual swing booms, you will need to push your item into the trunk of cargo area. Some boom lifts have two motors and both lift the item, and then swing it automatically into your vehicle. For trunks, you will now need to remove the boom arm and vertical pole and store them in your trunk alongside the item so that the trunk lid can close.
Installing an Inside Platform Lift
Step 1:
All inside platform lifts require a power source. Determine whether you want to use a rechargeable battery-pack option or have the lift wired directly to your car battery. This is not difficult, and can be performed by any company that rents trailers or even by your auto dealership at minimal cost. Your lift will come complete with the appropriate wiring harness. No wiring is required with a battery pack, and you can even upgrade to a charger that plugs into a "cigarette lighter" adapter in your car and charges your lift while you drive. No need to ever remove the battery pack for recharging.
Step 2:
Inside Platform lifts can be installed to the mounting hardware for the third row of seating in most SUVs or mini-vans, and require no drilling. We can provide modification kits for SUVs where the third row of seats stores in the floor of the vehicle. We'll require your vehicle make, model, and year at the time of purchase and will automatically include any modification kits necessary for your specific installation.
Step 2:
That's it! You are ready to use the corded controller for easy one button operation. Push the button and the lift will move outward, and then lower to the ground. Ride your scooter or power wheelchair onto the platform, secure with the straps, and push the button to store your unit in your cargo area.